Thursday, June 29, 2017

Nutanix .NEXT 2017 - New Announcements

I've been working hard to stay on top of all of the new announcements at Nutanix .NEXT 2017 here in Washington, D.C. 

Here are a few highlights that I've compiled so far, and will continue to add to as I learn more.

Xi Cloud Services and Xi Disaster Recovery
Nutanix Calm
Nutanix Xtract

Other new announcements include (more to come on these):


Nutanix X-Ray

Nutanix NX-9030-G? - NVMe, RDMA, 40Gb network, 1+ million IOPs

AHV Turbo Mode
1-click integrated backup (with 3rd party partner integrations) via Prism

Near Sync - <1 minutes RPO for async replication  with no distance restrictions or app performance impact

Acropolis File Services will have NFS support (Nutanix storage services are now completely aligned with Amazon storage services)

Nutanix on IBM openPower LC systems with built-in AHV 

1 and 2 node Nutanix clusters for ROBO and edge deployments

Prism Central on-demand scale out 

One click networks

One click micro segmentation with tag-based app policies with flow visibility

AHV vGPU support

New Prism Central UI and capacity analysis views 


New prism pro - dynamic alerting auto RCA and right sizing 

Nutanix .NEXT 2017 - Xtract

Today at Nutanix .NEXT 2017 in Washington, D.C., Nutanix announced a new migration product called Xtract.

The intention of Xtract is to simplify the transition to the Enterprise Cloud Platform. In plain English, Xtract will move VMs from VMware ESXi to Nutanix's Acropolis Hypervisor (AHV) with a single click, without guest OS agents, with minimal downtime, all while retaining existing VM network configurations and automatically inserting the required AHV guest OS drivers.

The Xtract workflow is a simple scan, design, deploy, migrate process.

Similarly, customers will be able to use Xtract to migrate Microsoft SQL databases to Nutanix AHV as well. Using a similar scan, design, deploy, migrate workflow, customers will leverage a design template to make sure all SQL database-specific considerations are accounted for, and created automatically. 


If you watched the general session this morning, you saw a demo of Xtract DB, where all of the low level details of the target SQL infrastructure were created automatically - vCPU, RAM, Guest OS, SQL version, individual disk sizing. Think of how much time that will save you.

One Xtract feature I found particularly useful is the batch upload process. Most organizations have dozens of SQL servers. You can populate all of the hostname and user credentials into a spreadsheet and upload it all at once to Xtract for discovery. Easy.

Once the VMs are provisioned in AHV, SQL replication populates the data from source to target. 

The clear intention of Xtract is to reduce the professional services costs and unique skillset required to otherwise migrate workloads to AHV. This should increase adoption of AHV by leveraging Nutanix's simple and easy 1-click graphical workflows. 

Be sure to check out nutanix.com/xtract for more details!

I would like to thank Marc Trouard-Riolle for sharing Xtract details with the Nutanix Technical Champion community. 

Nutanix .NEXT 2017 - Calm and Marketplace

Another exciting announcement this week at the Nutanix .NEXT conference in Washington, D.C. is around Nutanix's new product called Calm, which came from their acquisition of Calm.IO in August 2016.

Nutanix Calm provides application automation and lifecycle management for the Nutanix Enterprise Cloud Platform and public clouds, as well as self-service and governance, and hybrid cloud management.

So what is Calm and why is it needed? Managing applications has become increasingly complex. Consider these application automation and lifecycle management pain points:
  • More app components and platforms leads to increased response time and finger pointing
  • Knowledge silos and fragmented ownership leads to longer time to issue resolutions
  • User expectations are for frequent releases, but these complexities are leading to longer release cycles
If you add a hybrid cloud element to these existing challenges, the problem becomes worse due to a lack of interoperability between disparate cloud platforms.

So how do you solve this problem? It boils down to two things:
  1. Full stack automation
  2. A single control plane for application orchestration
Full stack automation with a single control plane for orchestration is exactly what Calm is. 

Let's look at Calm at a high level.


Now let's break Calm down into its three main layers - Application Lifecycle Automation and Modeling, Self Service and Governance, and Hybrid Cloud Management.

Application Lifecycle Automation and Modeling


Application blueprints are an intuitive and visual way to model applications. Blueprints incorporate all elements, including VMs, configurations, and binaries. Blueprints are how you can drive repeatable provisioning of applications. 


Self Service and Governance

Nutanix Marketplace empowers self-service through one-click app provisioning, pre-integrated blueprints, and role-based access control. Imagine no longer having to spin up VMs for somebody else. You build the blueprint, give them access to deploy it, and they take over from there. Think of an application vending machine for your business!


Hybrid Cloud Management

Where do you want your application to reside today? On premises? No problem. In the cloud? Which one? You pick. The choice is yours. For some customers, this will come down to availability or data locality requirements. For others, this is going to come down to cost. Imagine being able to truly understand the real cost of your cloud providers. You can with Nutanix Calm. 


Calm is expected to be generally available in September 2017 and start with Amazon Web Services (AWS) and Acropolis Hypervisor (AHV) support. Future releases will include support for ESXi, Hyper-V, Azure, and containers. I understand Calm releases will happen quite quickly after the initial release, so I would expect to see these features before the end of 2017.

Enjoy the rest of .NEXT 2017!

I would like to thank Greg Smith and Chris Brown at Nutanix for sharing this content with the Nutanix Technical Champion community.


Nutanix .NEXT 2017 - Xi Cloud Services & Xi Disaster Recovery Service

Today at the Nutanix .NEXT conference in Washington, D.C., Nutanix unveiled a major new offering that has been under wraps (to the best of my knowledge) for nearly a year. This exciting new product is called Xi (pronounced 'zye', rhymes with 'bye') Cloud Services.

Xi Cloud Services are delivered by Nutanix and consumed by Enterprise Cloud Platform customers (if you're a Nutanix customer, that's YOU.) They do that by providing a native cloud extension to the Nutanix Enterprise Cloud Platform, which is available via Prism.

When will Xi Cloud Services be available? Early access is expected in November 2017, with GA coming in early 2018.

"I thought cloud was super easy? I mean, anyone can spin up VMs in the cloud, right?" Sure, but hybrid clouds - specifically, a combination of your existing on-premises infrastructure PLUS resources running in one or more public clouds - are another beast entirely.


Management tools are often vendor-specific and the constructs used across platforms are disjointed. This is where Xi Cloud Services comes in.


Xi Cloud Services provides a complete platform extension to the cloud.

"I still don't get it. What's the point?" In order to adopt cloud, it needs to be non-disruptive. You can't spend time re-platforming applications. Think about what Apple did when they introduced iCloud. A simple toggle switch on your iPhone and you immediately got access to resources outside your phone without having to do anything. The phone OS stayed the same because iCloud was an extension of the OS. It was extremely simple to setup and use. It gave you incredible flexibility. That's Xi Cloud Services. Xi Cloud Services is the Enterprise Cloud OS.

"So give me a use case for Xi Cloud Services." OK, how about disaster recovery? In fact, the first offering for Xi Cloud Services is going to be the Xi Disaster Recovery Service.

DR allows customers to rapidly and quickly protect VMs without 3rd party products, professional services, or the need for a separate data center. If you're familiar with Nutanix's "1-Click" technology, think of this as 1-click DR.

"Hmm, we've been doing DR for years. Why can't we just keep doing that?" Well, think about the three ways customers are currently approaching disaster recovery.
  1. Do It Yourself - often complicated, capex-heavy, and requires highly specialized skills
  2. Managed Services Providers - expensive and relies heavily on professional services
  3. DR to Public Cloud - as mentioned above, on-prem and DR technology is disjointed, and is inherently complex
"Oh come on, it's not THAT bad." Let's consider the various touch points of any DR project for a second.
  1. Recovery Site Provisioning - find a site, buy a lot of stuff, build a lot of stuff
  2. Replication - get the data to the recovery site (perhaps in a variety of ways)
  3. Runbook Automation - plan the plan, in other words
  4. Security Policies - you didn't think your CISO would let you ignore that part did you?
  5. Network Connectivity - aside from replication connectivity, how will users and data ingress/egress the network at the recovery site? How will you fail back?
Take steps 1-5 above, and that's Xi Disaster Recovery Services rolled into one easy to consume service. To use the old tired utility analogy, you didn't build the power grid or the water works for your house. It's a series of complex technologies that someone made easy for you to subscribe to as a service.

Specifically, Xi Disaster Recovery Service:
  1. Eliminates the need for a dedicated DR site
  2. Is managed centrally through Prism
  3. Has flexible subscription plans
"Where will my Xi Disaster Recovery Service workloads reside?" At launch there will be US West region and a US East region, with two availability zones on each cost for a total of four nationwide. 

Let's take a look at a screenshot of Prism and how this would look to an end user. As you can see it's as simple as point and click.

First, select the VM and choose Protect from the Actions menu.


 Next, create the runbook, which helps define things like VM dependencies, boot order, and network settings.

As you can see, allowing or disallowing access of specific VM networks to the internet and creating backward connectivity to the source can all be done in a few clicks. Simple!

Now let's take a look at the DR Dashboard, which like all other Nutanix dashboards, gives you a wealth of information. You can see your RPO status, DR test status, and current bill for the DR resources you've consumed. 

I think this announcement is huge for Nutanix and will provide a lot of value to their customers. Disaster recovery has been far too complicated for too long. Many other competitors to Nutanix in this space need multiple products to pull this off, many of which were acquired and poorly integrated over time. 

I can't wait for my first Xi Cloud Services opportunity! Enjoy the rest of .NEXT 2017!

I would like to thank Greg Smith and Chris Brown at Nutanix for sharing this content with the Nutanix Technical Champion community. 

Monday, February 29, 2016

Deploying the Nutanix Acropolis File Server

Nutanix introduced a cool new feature in AOS 4.6 called Acropolis File Server (AFS). This is a distributed, highly available file server that runs on your existing Nutanix cluster and uses the same storage pool that backends your Acropolis Distributed Storage Fabric.

Before I go into too many details, I should point out that the AFS is in Tech Preview in 4.6, and is only available if you're running Acropolis Hypervisor.

Now that the disclaimer is out of the way, let's walk through setting up an Acropolis File Server.

Login to Prism and click the Home menu button at the top. You'll notice a new entry in this list compared to previous releases, called File Server. Click on that.

Now click on the "+ File Server" button in the top right corner. If you've been using Nutanix for awhile, this type of button should look familiar.


If you're running AOS 4.6, you'll be warned that the file server feature is in Tech Preview and not intended for production workloads. There is also no promised upgrade path from the 4.6 version to a future GA version.


Click Continue

Now you can define your AFS server properties, starting with the name. This is the name that will be added as a Computer object to Active Directory, and thus DNS. This is your single namespace, so choose wisely.

You can provide other details here as well. Just like with your first Nutanix cluster, the minimum number of AFS nodes is 3. There are limited vCPU and RAM options for these VMs. I chose the minimum allowed configuration.


Click Next

On the network page, you can choose both an internal (AFS VMs to CVMs) and external (clients to AFS VMs) network for the AFS VMs to use. I was lazy and chose a single flat network for both and it seems to work. Don't forget to add your DNS and NTP servers.


On the next screen, you define your Active Directory domain and provide credentials. This will create a Computer object in AD, and if you're using Active Directory integrated DNS, DNS records for the AFS VMs.


Now sit back and wait for the VMs to be created. A blue status icon will appear at the top of Prism.


If you navigate to the VMs menu, you will soon see the VMs show up in the list. I filtered to keep the list small.


You can even open a console to the VMs, but there isn't much to see.


Once the task hits 100%, you can now create your first share. Click the Home menu again and select File Server. On the upper right side, you should see a + Share button.

I want to use this share as a home drive for my VDI users, so I've called the share Home.


That's about all there is to it from a Nutanix perspective. You may be wondering where to set file share permissions. I suggest finding the AFS Computer object in Active Directory, right-clicking and selecting Manage. This will bring up the familiar Computer Management snap-in. In my experience, this took awhile. You may also just try to make a UNC connection straight to \\afs.fqdn\sharename if you prefer. Whichever way you do it, you want to get into the share properties so that you can adjust the Windows Security settings. By default, Domain Admins have access to the share. 


In my case, I used the Advanced button in order to add my AD account to the ACL with Full Control. 

Don't be fooled by the built-in Administrators and Users groups. I found Administrators to have my Domain Admins group nested, and the Domain Users group was nested in the Users group. However, I found the permissions to be inadequate for writing to the share. Maybe it had something to do with cross-domain AD membership and kerberos or something. I'm not 100% sure but found it best to explicitly set the permission with my account and not leverage the built-in groups. For security's sake you may want to at least remove the Users built-in group.

Now you should be able to create a directory in the share. For some reason, Acropolis File Server does not allow you to create files at the root of the share, only directories. In my case I plan to create a unique directory for every user, so that's not a show stopper. 


You may wonder how the single namespace works with DNS. Since I have three AFS VMs, I have 3 different DNS A records for the same file server name, each pointing to the unique external IP of the respective AFS VM.

You may also wonder how the overall lookup and authentication flow works. Thanks to Dwayne Lessner (@dlink7) for providing this image and the steps.


The above diagram shows what happens behind the scenes when a client sends a file access request. 
1.    When a user “Nicki” wants to access her files, a DNS request is first sent for the file server name.
2.    A DNS reply comes back with the address of a file server VM, using DNS round robin; in this example, the IP for file server VM-1 was returned first. 
3.    A create/open request is sent to file server VM-1. 
4.    The \Nicki folder doesn’t exist so a STATUS_PATH_NOT_COVERED is returned.
5.    The client then requests a DFS referral for the folder.
6.    file server VM-1 refers the client to file server VM-3 by looking up the correct mapping in the file server’s zookeeper.
7.    A DNS request goes out to resolve file server VM-3.
8.    The DNS requests returns the IP of file server VM-3.
9.    The client gets access to the correct folder.


Tuesday, January 26, 2016

Nutanix Acropolis Hypervisor - Adding VMs to Image Service

If you've read my previous posts, you'll see I've provided instructions for building a new VM in Acropolis Hypervisor (AHV), as well as bringing a VM from ESXi into AHV. This post is going to focus on turning one of those VMs into an image (that's Nutanix for "Template") so that you can build new VMs from it quickly and easily as needed.

This post assumes you've already got a Windows VM built, either new or imported from ESXi. In either case, now would be a good time to patch it and make any other updates that you've been putting off.

Once you're ready to clone this VM, make sure to run Sysprep to generalize the Windows OS.

While the new and improved Image Service allows you to upload ISOs and disks using Prism, it doesn't allow you to add a VM that's already running on Nutanix to Image Service that way. For that you'll need to roll up your sleeves and use the Acropolis Command Line Interface (acli).

Login to any Controller VM (CVM) via SSH.
Type acli and press enter.
The first thing we need is the UUID of the vmdisk, so for that we'll use the vm.disk_get command. Like any good cli, you can use the tab key to auto populate information. If you type vm.disk_get and hit tab you'll see the names of all VMs in your cluster.

<acropolis> vm.disk_get
TestVM        W2K12R2-Test  blmpower1

Start typing the name of the VM you want to query and press tab again to fill in the rest.

<acropolis> vm.disk_get W2K12R2-Test
addr {
  bus: "ide"
  index: 0
}
cdrom: true
empty: true
addr {
  bus: "scsi"
  index: 0
}
vmdisk_uuid: "69df5abd-6570-4ce1-ba77-2d117c3df7e5"
source_vmdisk_uuid: "d6c7a984-421c-403e-b579-4885961c698d"
container_id: 8
vmdisk_size: 42949672960

Here you see the vmdisk_uuid. Select the whole string inside of the quotes.

Now use the image.create command (covered in a previous post) to create a new image using the existing disk.

<acropolis> image.create W2K12R2-Template clone_from_vmdisk=69df5abd-6570-4ce1-ba77-2d117c3df7e5 image_type=kDiskImage
ImageCreate: complete

Now when you click the gear icon in Prism and select Image Configuration, you'll see the new image listed there. Now it can be selected straight from Image Service by anyone who needs it when building a new VM.


Converting ESXi to Acropolis Hypervisor - Part 3 - Importing VMware Virtual Machines

In my previous posts we destroyed a Nutanix cluster running ESXi and installed Acropolis Hypervisor (AHV) using the Foundation 3.0 process, which is now built directly into each Nutanix Controller Virtual Machine (CVM).

Now it's time to pull some VMs from your legacy ESXi environment into AHV. Keep in mind that if you're already a Nutanix customer with an ESXi hypervisor cluster, this process will be automated in a future release (as shown during the general session at the .NEXT conference in Miami).

Before proceeding, you might want to take a quick look at my other post on using the Image Service and creating a virtual network for your VMs as a quick primer, as I won't go into great detail on either of these here.

If you're not already running ESXi on your Nutanix cluster and are starting from scratch with AHV, you can use these steps to import VMware VMs into Acropolis. This can be done through a few different methods, but if you've got a set of VMware templates that you use all the time, it would make sense to import those into the Acropolis Mobility Fabric (AMF) Image Service so that you can clone them easily.

The AMF Image Service supports a variety of formats, including raw, vhd, vmdk, vdi, iso, qcow2. This means you won't need to convert an ESXi vmdk to a different format in order to use it with AHV. If you're using Windows, the VirtIO drivers need to be installed before bringing the VM over to AHV. Think of VirtIO as Nutanix Guest Tools, or the equivalent of VMware Tools. You need the virtual SCSI driver in order to boot the VM.

In my example I am going to take an existing Windows Server 2012 R2 template in ESXi and prepare it for migration into AHV.

To start, I am going to deploy a new VM from the existing template so that I can install the VirtIO drivers on it without changing the original template. 

Next I will install the VirtIO drivers. These are available from the Nutanix portal as both an ISO image as well as an MSI executable.

Once the VirtIO drivers are installed, uninstall VMware Tools. 

Now power off the VM. Make sure there are no VMware vCenter-based snapshots for the VM. Make a mental note of where the VM's vmdk file resides. 

Make sure you download the VM's "flat" vmdk file. You should see the word 'flat' in the name, and it will be much larger than the other VMDK file.


This could take some time depending on the size of the VM. Once the download is complete, login to Prism, click the gear icon, and select Image Configuration.


If you read my previous post on getting started with the Image Service, these steps should be familiar. 

Click the 'Upload Image' button and fill in the details.


Click Save to begin uploading the VMDK file.

Once the image creation is complete, close the Image Configuration window and go to the Prism VM view.

We're now going to create a new VM based on the VMDK file that we pulled over from our old ESXi environment.

Click 'Create VM' and give the new VM a name, vCPU, and memory.

Click 'New Disk', change the Operation drop down to 'CLONE FROM IMAGE SERVICE', and select the Image that you created in the previous section.


Click Add and give the VM a NIC if you prefer. Once complete, click Save.

Since this is a clone operation, it will happen very fast.

Click the Table view and select the new VM. Click 'Power On' (underneath the table) and then Launch Console once it becomes available. You should see the VM boot into Windows as you normally would. 


You only need to bring your template VMs from ESXi into the Acropolis Image Service once. From there you can clone as many times as needed directly from Prism, or from acli, the AHV command line.

You may be curious about how the devices appear to Windows once moved to AHV. You can login to Windows and look at Device Manager. 


Monday, January 25, 2016

Nutanix Acropolis Hypervisor - Getting Started with Virtual Machines

In the previous post, I showed you how to import an existing ISO file to the Nutanix Acropolis Mobility Fabric image service, as well as how to create a virtual machine network. Now it's time to get to the fun part...creating VMs.

Acropolis Hypervisor - Creating Virtual Machines

Login to Prism and click on the Home drop down menu at the top left side. Select VM from the menu.

If you've used Nutanix with other hypervisors in the past, you'll notice a new button with Acropolis Hypervisor (AHV). There is a "Create VM" button on the top right side. Click it to get started.


First, give the VM a name, along with come vCPU and memory resources.


Now let's add a virtual disk by clicking the "New Disk" button. This menu has a lot of different options which I plan to elaborate on later. For now, let's take the defaults and give it a modest amount of disk based on the Guest OS you intend to use. I'm using a minimal CentOS build in this example.

Click Add. Now you'll see two disks for this VM. One is a CDROM and the other is a standard virtual disk.

Click the pencil icon for the CDROM drive. Under the Operation drop down, select "CLONE FROM IMAGE SERVICE" and use the Image drop down to select the ISO file that you wish to use. If it's not there, go back to my previous post about using the Image Service and import it.


Click Update to save this configuration.

Now click on the "New NIC" button. This is one minor annoyance that I have with Acropolis so far in that it doesn't display the name that I gave to the network configuration when I created it. Instead it just shows vlan.0 and any other VLAN IDs that have been defined. It can be hard to remember VLAN IDs so displaying the network name (such as "VM Network") would be a bit more helpful, in my opinion. 

If you are using IP Management in Acropolis as previously discussed, there is no need to manually assign an IP address here. 


Click Add to complete. Review your settings and click Save to create your first Acropolis Hypervisor VM.

The VM will show up in either the VM Overview or VM Table views in Prism. If you've already created a bunch of VMs, you can use the 'search in table' box to find it. Once you click on it, you will see some options underneath the table to Power On, Take Snapshot, Clone, Update, or Delete. Power the VM on.

Once the VM is powered on you can Launch Console to interact with it. You should see the VM booted to the ISO file that you specified. 


If you're a Google Chrome fan, you'll see a prompt that the preferred browsers for the Launch Console are Firefox and Internet Explorer. I'm not sure what IE can do better than Chrome, but you may find some weird behavior if you insist on using Chrome. Personally I ran into some keyboard issues, particularly typing periods. It just didn't work with Chrome. 

One nice thing about building a Linux VM on AHV is that you don't need to load any special device drivers for the virtual machine's virtual SCSI adapter. If you're building a Windows VM, make sure you download the VirtIO drivers from the Nutanix portal and add it to the Image Service. 

I won't highlight the OS install process here as I assume if you've made it this far, this isn't your first rodeo. You'll notice the install is very fast thanks to the Image Service. It's not pulling it across the wire through an ISO mount process from your client or anything like that. It's pulling it directly from the same container that it's running on. Slick.

Remember to disconnect the ISO file from the VM's CDROM drive after all the binaries are copied and the install process is complete.

Consider this VM your base template if you will. All other VMs can be cloned from this one.

If you want to clone this VM once, you can easily do that from Prism by clicking on the VM name and then clicking the Clone link underneath the VM table.

However, if you want to clone this VM multiple times, you can use Acropolis CLI, or acli.

Login to any Controller VM (CVM) in your cluster and type acli and press enter.

At the acli prompt, issue a command similar to the following to clone the VM multiple times at once.


<acropolis> vm.clone testclone[1..10] clone_from_vm=TestVM

This command will create 10 virtual machines named testclone1 through testclone10, all cloned from the same TestVM virtual machine created in the previous steps. 

You can then use the vm.on command to boot them all simultaneously. For example:

<acropolis> vm.on testclone*


Nutanix Acropolis Hypervisor - Getting Started with Pulse, Image Service, and Network Config

In my previous posts I showed you how to blow away a Nutanix cluster running ESXi and deploy Acropolis Hypervisor (AHV) from scratch. At this point you should have pointed your web browser to an IP address of one of your CVMs, or to the cluster IP if you created one. This will take you to the Nutanix Prism interface.

The default password has changed since the early days of Nutanix. For a clean install of 4.5.x, login as admin admin. You'll be prompted to change the password immediately, as well as agree to the Nutanix EULA.

Now that you've logged in, you should see the Prism Home screen, which is a great overall dashboard.

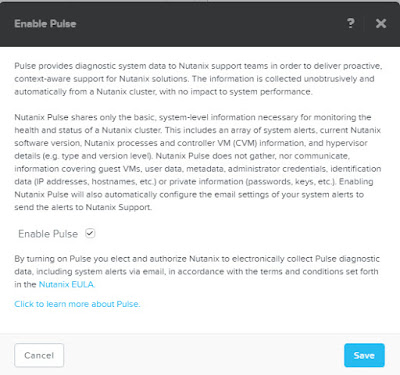
You'll see right out of the gate a red banner across the top, which is telling you to enable Pulse.


Click the "Learn more and configure Pulse" link.

Pulse is a great way to send diagnostic data to Nutanix in order to provide proactive support. There is no security sensitive information sent to Nutanix. I'm sure you've already read the EULA and want to enable Pulse. To do so, make sure Enable Pulse is checked and click Save.


Acropolis Hypervisor Image Service
Now let's pull some ISOs into the environment by using the Image Service. That way we have the software we need to build some VMs.

In the old days, you had to import ISOs or disk files into the Image Service with an acli command line string. However, this can now be done by using Prism.

Old Way

Login to any Nutanix CVM using SSH.

Enter the Acropolis CLI by typing acli and pressing enter.

The Image Service supports file access via http or NFS. If you're like me, you may have had your ISOs sitting on a Windows file server. It was a little annoying getting IIS configured to simply list the directory contents, but that's how I did it. I'm not an IIS expert by any stretch, so Google is your friend for that task.

Now that you're in the acli, let's pull in an ISO. I'm using CentOS 6.4 as an example.

<acropolis> image.create centos-6.4-x86_64-minimal source_url=http://iswblmvum01.tec.sirius/CentOS/CentOS-6.4-x86_64-minimal.iso container=default-container-12996 image_type=kIsoImage

The syntax can be viewed and explained by using the Acropolis Application Mobility Fabric Guide.

Essentially I created an image named centos-6.4-x86_64-minimal and pointed to my shiny fancy new IIS server, which was simply configured to use the existing file share as its root directory. You'll notice the container name specified for the container= argument is referencing a default container. This is the one that was created by the Foundation process when the cluster was built. You can tab complete this part via acli, and it will automatically put it there for you. When complete you should see a completion message.

ImageCreate: complete

You can now list the contents of your image store as well by issuing an image.list command in acli.

<acropolis> image.list
Image name                 Image UUID
WindowsServer2012-VL       1975dcf6-14c3-4bf9-9cc1-4ee88ae49b19
WindowsServer2012R2-VL     87a86643-1234-4648-b53e-359c8f13f87a
centos-6.4-x86_64-minimal  5136dedf-7d32-403c-8923-4fde986bc8ef

If you plan on deploying Windows VMs, make sure to download the VirtIO ISO for Windows from the Nutanix portal and add it to the Image Service as well. You'll need the VirtIO SCSI driver to see the virtual disks in AHV VMs. 

New (and improved) Way
Click the gear icon in Prism and select Image Configuration.
Click the "Upload Image" icon and give the image a name, a description (e.g. annotation), and select the image type. The image type will be ISO or disk. The Image Service supports raw, vhd, vmdk, vdi, iso, qcow2 disk formats. You can continue to upload from a URL if you prefer, or you can upload the file directly from your browser, which is very handy and a big time saver.

When you're finished, you'll see all of the images that have been uploaded. You can choose to activate them or make them inactive, which will hide them and prevent them from being used.


Acropolis Hypervisor Network Config
Now we need some networking for our VMs. Login into Prism and click the VM drop down from the menu. Look for a link in the top right corner that says Network Config. Click it.

Click the Create Network button.

Since old habits die hard, I'm calling my network 'VM Network'. I'm also not using any VLAN tags in this environment, so I've specified VLAN 0 to allow the native VLAN to come through.


Nutanix can do IP address management for you, so let's configure that as well to make things easy.

These steps are pretty straightforward. You define a network in CIDR notation (e.g. 192.168.50.0/24), along with the default gateway for that network. 

You can choose whether or not you want to list DNS servers, as well as the domain search order, as well as the overall domain name. 

If you have a TFTP boot server, you can define that here as well, along with the boot file name.

To set an IP range, click the "Create Pool" button under the IP Address Pools section. Provide a start and end address. 

Finally, you can override any existing DHCP server that might be out there by specifying its IP address. Don't make your network admin mad!

In my next post we'll finally get to the fun part...creating a VM.