Showing posts with label VMware. Show all posts

Tuesday, January 26, 2016

Converting ESXi to Acropolis Hypervisor - Part 3 - Importing VMware Virtual Machines

In my previous posts we destroyed a Nutanix cluster running ESXi and installed Acropolis Hypervisor (AHV) using the Foundation 3.0 process, which is now built directly into each Nutanix Controller Virtual Machine (CVM).

Now it's time to pull some VMs from your legacy ESXi environment into AHV. Keep in mind that if you're already a Nutanix customer with an ESXi hypervisor cluster, this process will be automated in a future release (as shown during the general session at the .NEXT conference in Miami).

Before proceeding, you might want to take a quick look at my other post on using the Image Service and creating a virtual network for your VMs as a quick primer, as I won't go into great detail on either of these here.

If you're not already running ESXi on your Nutanix cluster and are starting from scratch with AHV, you can use these steps to import VMware VMs into Acropolis. This can be done through a few different methods, but if you've got a set of VMware templates that you use all the time, it would make sense to import those into the Acropolis Mobility Fabric (AMF) Image Service so that you can clone them easily.

The AMF Image Service supports a variety of formats, including raw, vhd, vmdk, vdi, iso, qcow2. This means you won't need to convert an ESXi vmdk to a different format in order to use it with AHV. If you're using Windows, the VirtIO drivers need to be installed before bringing the VM over to AHV. Think of VirtIO as Nutanix Guest Tools, or the equivalent of VMware Tools. You need the virtual SCSI driver in order to boot the VM.

In my example I am going to take an existing Windows Server 2012 R2 template in ESXi and prepare it for migration into AHV.

To start, I am going to deploy a new VM from the existing template so that I can install the VirtIO drivers on it without changing the original template. 

Next I will install the VirtIO drivers. These are available from the Nutanix portal as both an ISO image as well as an MSI executable.

Once the VirtIO drivers are installed, uninstall VMware Tools. 

Now power off the VM. Make sure there are no VMware vCenter-based snapshots for the VM. Make a mental note of where the VM's vmdk file resides. 

Make sure you download the VM's "flat" vmdk file. You should see the word 'flat' in the name, and it will be much larger than the other VMDK file.


This could take some time depending on the size of the VM. Once the download is complete, login to Prism, click the gear icon, and select Image Configuration.


If you read my previous post on getting started with the Image Service, these steps should be familiar. 

Click the 'Upload Image' button and fill in the details.


Click Save to begin uploading the VMDK file.

Once the image creation is complete, close the Image Configuration window and go to the Prism VM view.

We're now going to create a new VM based on the VMDK file that we pulled over from our old ESXi environment.

Click 'Create VM' and give the new VM a name, vCPU, and memory.

Click 'New Disk', change the Operation drop down to 'CLONE FROM IMAGE SERVICE', and select the Image that you created in the previous section.


Click Add and give the VM a NIC if you prefer. Once complete, click Save.

Since this is a clone operation, it will happen very fast.

Click the Table view and select the new VM. Click 'Power On' (underneath the table) and then Launch Console once it becomes available. You should see the VM boot into Windows as you normally would. 


You only need to bring your template VMs from ESXi into the Acropolis Image Service once. From there you can clone as many times as needed directly from Prism, or from acli, the AHV command line.

You may be curious about how the devices appear to Windows once moved to AHV. You can login to Windows and look at Device Manager. 


Tuesday, May 26, 2015

vSphere 6 - Configuring SSO with an Active Directory Identity Source

Configuring vSphere 6 SSO

After deployment, one thing I notice right away is a new section under the vSphere Web Client Administration interface. You can get to this by clicking Home->Administration. The image on the left is how the Administration section looked in vSphere 5.5, while the image on the right shows how it looks in vSphere 6.


Notice a new section under Administration called Deployment. This is where you manage your PSC. I stumbled on this when I attempted to add a new SSO Identity Source. When I selected the Active Directory (Integrated Windows Authentication) radio button, the client told me that I had not yet joined vCenter Single Sign-On to a domain, and provided me with a link to get there.


Clicking this link takes you straight to the Home->Administration->System Configuration section. One thing I noticed is that even though there is a field for Organizational Unit, this is not required if you want the Active Directory computer object for your PSC to be in the default Computers container. You can leave that field blank.


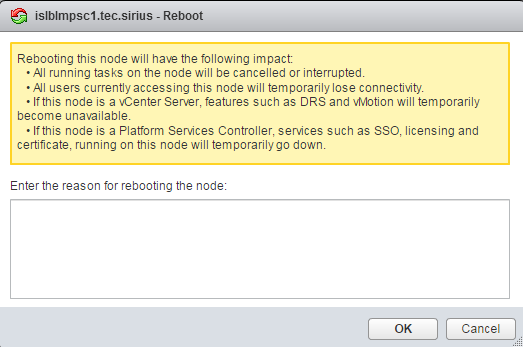
You won't receive much a confirmation message, but the task will show up in the Recent Tasks pane. You can also confirm whether or not it worked by checking AD for the PSC computer object. You'll need to completely restart the PSC after joining the domain. Before you go over to your vSphere client and reboot it, right-click on the PSC node name and select Reboot. A helpful warning message pops up letting you know exactly what the impact will be.


Once the reboot is done we can continue to configure vCenter Single Sign-On. Navigate to Home->Administration->Configuration (under Single Sign-On) and click the Identity Sources tab. When selecting the Active Directory (Integrated Windows Authentication) radio button, you'll see your AD domain name populated, and the "Use machine account" radio button selected. Click OK.


Simple. Now that we have an identity source, we can configure users and groups, which is also located under the Single Sign-On section of Home-Administration. You have a lot of options here, but I personally prefer to add AD admin groups or users to the built-in Administrators group. You'd do that by selecting the Groups tab, selecting Administrators, and clicking the icon in the Group Members section to edit the group membership. Use the domain drop down to select your AD domain and then search for the applicable users or groups to add. This is another great reason NOT to name the vCenter Single Sign-On domain the same as your AD domain. 

vSphere 6 - Deploying the vCenter Server Appliance & the Platform Services Controller

I participated briefly in the vSphere 6 beta, but now that it's been a few months since the general availability release, it's time that I roll up my sleeves and get my hands dirty.

If you've paid any attention at all to the beta or the GA release, you'll notice that there are quite a few changes in the vSphere 6 management topology. Specifically there is a Platform Services Controller (PSC), which is now responsible for vCenter Single Sign-On, License service, Lookup Service, and VMware Certificate Authority. There is also a new deployment mechanism for the Linux-based PSC appliance as well as the Linux-based vCenter Server Appliance. This is just scratching the surface, so I hope to outline a few of the changes that I've found meaningful while deploying the latest release.

vSphere 6 Deployment
Assuming you don't want to use Windows for vCenter Server and/or the Platform Services Controller, you'll need to use the new web-based deployment tool in order to deploy these virtual appliances. This is done by downloading the VMware-VCSA-all-6.x.x-yyyyyyy.iso file from VMware's website. From there you mount the ISO (grumble grumble, Windows 7 user, grumble grumble) and install the latest VMware Client Integration Plugin. If you try to vcsa-setup.html file first, you'll be notified that you're missing the plugin.


It would have been really nice (and taken all of about 30 seconds and one extra line of code) of VMware to have provided a link to the plugin directly from this page so I didn't have to go hunting for it. It's inside of the vcsa folder of your mounted ISO. Once the Client Integration Plugin is installed and your browser is allowed to access it, you should be all set. Oh, you'll need at least one ESXi host built already as well, which is where the appliances will be deployed. It doesn't need to be running the same version of ESXi. If you already have a management cluster or something, you can use that. Also, if you're exclusively using the vSphere Distributed Switch, you're going to need one port group with ephemeral port binding. More on this later.

Initially I found the lack of an OVA for vCSA 6 annoying. As a Windows 7 user, I don't have a way to mount an ISO natively. Sure I can just mount the ISO on an existing VM, but then I'm pulling the ISO across the LAN, or I need to move the ISO to that VM or a datastore. It's just kind of a pain. My guess is that VMware did this so that all of the post-deployment packages could be deployed, and all the install scripts could be executed automatically. Compare this to what you'd typically have to configure manually for a Windows-based deployment, and perhaps you can appreciate the new automated appliance-based deployment. It still has some kinks, though. For example, if you fat finger the NTP servers, the entire process will fail. It won't give you a chance to go back and correct it. It also won't clean up the half-deployed VM for you. You have to stop and delete it manually and start over again. Boo.

vCenter Server Appliance Deployment Issues
One problem I had seems to be specific to my Windows 7 64-bit laptop because it did not occur when mounting the ISO on a Windows Server 2008 R2 VM. After specifying the FQDN, username and password of my target ESXi host, then accepting the certificate warning, the process would always fail with the message "filetransfer.exe has stopped working", which was actually from Windows.


Now this could be due to a number of issues. First, I could have some security setting on my laptop that is enforced by my employer that I'm not aware of or able to override. Second, I used the portable version of WinCDEmu to mount the ISO, which may not have been the best choice. Initially I thought it was a browser issue, but it failed on IE, Firefox, and Chrome at the exact same spot. I gave up and just mounted the ISO using the vSphere Client to an existing Windows Server 2008 R2 VM and everything worked great from there.

vSphere 6 Deployment Options - External Platform Services Controller
After accepting the EULA, pay close attention to the "Before proceeding" text at the bottom of step 2. If you exclusively used a vSphere Distributed Switch (VDS), you're going to need (at least temporarily) an ephemeral port group. More on this later.


Starting on step 3 of the VMware vCenter Server Appliance Deployment wizard, you'll have a chance to input your appliance name (aka VM name), along with the password. Decide now if this is going to be a vCenter Server Appliance with an embedded PSC, or if you're going to spin up an external PSC first (my preference). The reason for this is that you'll probably want your VM name to represent the role of the appliance. More on this in a minute.

Step 4 gives you a brief explanation of your Platform Services Controller (PSC) deployment type. Unless you are a very small shop with no chance of ever having or needing a second vCenter server, I would recommend deploying an external PSC. The reason for this is because the embedded PSC cannot be changed to an external PSC later on, and there are a lot of potential reasons why you may deploy a second vCenter Server down the road (SRM and Horizon to name two common reasons). There is a lot of good information in the vSphere 6 Installation and Setup Guide, as well as the Upgrade Guide. I like to plan for the future and in this lab environment, I really want to test PSC replication and Enhanced Linked Mode, so I'm going with an external PSC.


Keep in mind if this is a brand new environment, and you're choosing to use an external PSC, you need to deploy the PSC FIRST, before vCenter Server (hence my VM name recommendation above).

Now in my environment, I already have another external PSC up and running. This is going to be my second PSC, so I will be joining an existing SSO domain. If this is your first SSO domain, you'd create new. If you are creating new please heed the warning at the bottom of the screen that states "Before proceeding, make sure that the vCenter Single Sign-On domain name used is different than your Active Directory domain name." That should be really obvious, but I've seen it happen. It's way too confusing telling the difference between AD and vCenter SSO when it comes time to configure users, groups, and permissions. That warning doesn't apply if you're joining an existing vCenter SSO domain. Make sure you note your SSO administrator password as well. You're going to need this later.


Step 6 left me a little confused because as of late May 2015, there is very little documentation or guidance on multi-site SSO for vSphere 6. From what I can tell, there isn't much of a change to multi-site SSO guidance in vSphere 6 versus vSphere 5.5. That said, there is plenty of discussion on how to configure highly available PSCs and vCenter servers at each site. My understanding is that the biggest benefit to creating a new site is to increase SSO performance for authentication-related services at each site. In other words, the authentication data is replicated. If all you're looking to do is add availability for the PSC at the same site, you'd simply join the existing site. I want to emulate two different sites, so I'm creating a new one.


The next step allows you to select the appliance size, but from what I've seen so far, this only applies to the vCenter Server Appliance, and not the PSC. The Platform Services Controller VM needs 2 vCPUs, 2GB of memory, and 30GB of disk space.

The rest of the wizard is straightforward. You select your datastore & network settings. However, one thing I noticed is that since I'm using a distributed virtual switch with distributed virtual port groups, I was not allowed to select them in the choose a network drop down. What gives? If you click the help icon next to this drop down you'll notice that "non-ephemeral distributed virtual port groups are not supported, and [therefore] not shown in the dropdown list." OK, I guess I need to create a new distributed virtual port group with ephemeral port binding. I didn't run into this the first time around because my other cluster is using standard virtual switches. Unfortunately a simple addition of a distributed virtual port group opened up a huge can of worms for me. As soon as I added it, my vCSA's vpxd process began starting and crashing over and over again. After checking the logs, I stumbled on this KB article, Sadly, the fix listed in the KB only applies to vCenter Servers using SQL. Fortunately this guy had a similar issue and graciously provided the postgres DB syntax. I love the VMware Communities!

vSphere 6 Deployment Options - vCenter Server Appliance
If you're deploying an external PSC (as outlined here), your next step is to repeat the same process, except select "Install vCenter Server (Requires External Platform Services Controller)" on step 4 of the vCSA Deployment Wizard.
Step 5 will then ask you for the PSC host name and SSO password.
Unlike the PSC appliance, Step 6 for the vCenter Server allows you to choose the size, including an option for a tiny deployment. Keep in mind a "small" vCSA deployment is now 4 vCPUs and 16GB of RAM! That's 2x the size of my production vCenter server back in the 4.x days (with an external database).
Just like with the PSC deployment, Step 7 allows you to select the datastore and thin provisioning.
Step 8 allows you to configure your database. I prefer to use the embedded vPostgres database. Your only other option is Oracle. SQL is not supported with the vCSA.
Step 9 allows you to configure the vCSA's network settings.

Tuesday, January 20, 2015

Manually Deactivating a Nutanix Protection Domain

Nutanix Protection Domains are either Active or Inactive, depending on which cluster is protected (e.g. a Prod site sending data) or unprotected (e.g. a DR site receiving data). I was poking around in my DR cluster and happened upon my inactive Protection Domain. I noticed that when I clicked on the PD name, there was an Activate link in the bottom right corner.


I foolishly decided to click the Activate link, which left me with an active protection domain at both my sites. Replication from Prod to DR immediately stopped working. I expected a Deactivate link to appear in Prism, but it did not. OK, I'm sure there is a way to issue a deactivate command via ncli, right? Well, not exactly.

ncli> protection-domain
add                              create                           remove                           rm                               list                             ls
activate                         rollback-pd                      migrate                          list-snapshots                   ls-snaps                         add-minutely-schedule
add-hourly-schedule              add-daily-schedule               add-weekly-schedule              add-monthly-schedule             remove-from-schedules            clear-schedules
ls-schedules                     set-retention-policy             clear-retention-policy           ls-pending-one-time-snapshots    add-one-time-snapshot            create-one-time-snapshot
rm-one-time-schedules            restore-snapshot                 protect                          unprotect                        rm-snap                          rm-snapshot
list-replication-status          ls-repl-status                   retain-snap                      retain-snapshot                  pause-repl                       pause-replication
resume-repl                      resume-replication               abort-repl                       abort-replication                ls-pending-actions               metro-avail-enable
metro-avail-disable              promote-to-active

There is an 'activate' command, but no 'deactivate' command. So how do I get rid of this thing? I searched high and low, including the Nutanix Bible, but I couldn't find a way to do it. A simple Nutanix support request later, and I was given this hidden command. 

ncli pd deactivate_and_destroy_vms name=MSP-PD

Think about what you are doing before you issue this command. There is a reason it's not shown in ncli. The "_and_destroy_vms" portion of that command should give you a clue as to the potential impact. USE AT YOUR OWN RISK

As soon as I issued this command, I got a message back that said the PD was marked for removal. A few seconds later, my protection domain was again shown as inactive in Prism, and the replication jobs from my Production site started working again.

I should note that even though the command seems to indicate that it's going to destroy data, all of my snapshots at the remote site were still intact, so subsequent replications were not full replications. 

Wednesday, January 7, 2015

Storage vMotion Impact on Nutanix

In my previous post, I created a separate Nutanix container to house VMs that I choose to protect with SRM using the SRA for Nutanix. Since a container is a separate datastore, I had to use Storage vMotion to get the VMs from the existing container to the new one. I wasn't prepared for the impact his had on my Nutanix CVMs and SSDs.


The majority of the VMs being moved are on hosts A and B.


Since, regardless of container, all the data is sitting on the same disks anyway, it's too bad that this all has to be funneled back through CVMs again. I assumed with VAAI that this would happen quickly, but it doesn't seem that has been developed by Nutanix as of yet. My fingers are crossed that a future release of NOS will address this issue. 

Fun with Nutanix SRA

I was fortunate to get my hands on a pair of Nutanix blocks so that I can test Protection Domains with VMware Site Recovery Manager. Never one to RTFM, I went head first into installing my SRM servers and the Nutanix SRA shortly after configuring a Nutanix remote site and Protection Domain. It wasn't until I started getting error messages in SRM that I finally decided to consult the documentation.

I was a bit annoyed that I had to go into ncli in order to protect the vstore, when I had already gone ahead and created a protection domain and remote site with all the container info already. So as soon as I initiated the ncli vstore protect command, I realized that I really didn't want to have every VM in that container replicating. So I can just issue an ncli vstore unprotect command, right? Wrong.

ncli> vstore unprotect name=MSPNFS
Error: Error while unprotecting vStore having id 9868120: MarkPdForRemoval command not inited.

What the heck does that mean? Command not 'inited'? Google came up way empty on that one.

Turns out you can simply whack the auto-created protection domain using the following ncli command:

ncli> protection-domain remove name=MSPNFS_1420656211839
Protection domain MSPNFS_1420656211839 has been successfully marked for removal

A few seconds later, my auto-created protection domain disappeared from Prism, and ncli vstore list showed my container was no longer protected.

Now I need to configure a separate container for this so I can move VMs in and out as needed for SRM. 

More to come.